
For clients
VFX Pulls in Resolve
How to pull VFX plates out of DaVinci Resolve in an ACES colour-managed workflow — project setup, IDTs, EXR renders and the show-look LUT.
- DaVinci Resolve
- ACES
- EXR delivery
For more information about the ACES implementation in DaVinci Resolve, see the Color Management using ACES chapter in the Data Levels, Color Management, and ACES section of the latest DaVinci Resolve Manual.
The following is from the Netflix Partner Help Center. If you like video instruction, you may also want to check out ACES Set Up in DaVinci Resolve and ACES Deliveries in DaVinci Resolve, made by Netflix in partnership with Blackmagic.
Project Settings
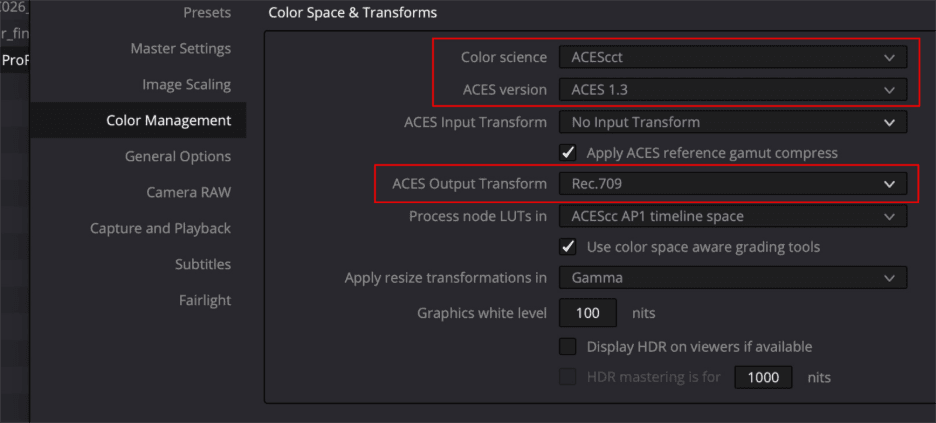
Once a new project is created, go to the Project Settings › Color Management panel.
Change the Color science setting to ACEScct. If you do not have a specific reason to use ACEScc, it is recommended to use ACEScct.
We recommend using the latest ACES version.
Set your ACES Output Device Transform to match the calibration and capacities of your display — which will be SDR for pulls. For SDR, this will be Rec.709.
This corresponds to a monitor calibrated to Rec.709 / BT.1886 with 100 cd/m² peak luminance.
Bringing in Clips
By default, for RAW clips, Resolve will automatically debayer images in ACES and you should see a normal looking image.
For non-RAW formats (such as MXF, DPX, ProRes, XAVC, etc.), Resolve may not automatically detect the colour space and will read the footage in with the native camera log colour space. An indication of this is if your image looks washed out, which is typical of log footage.
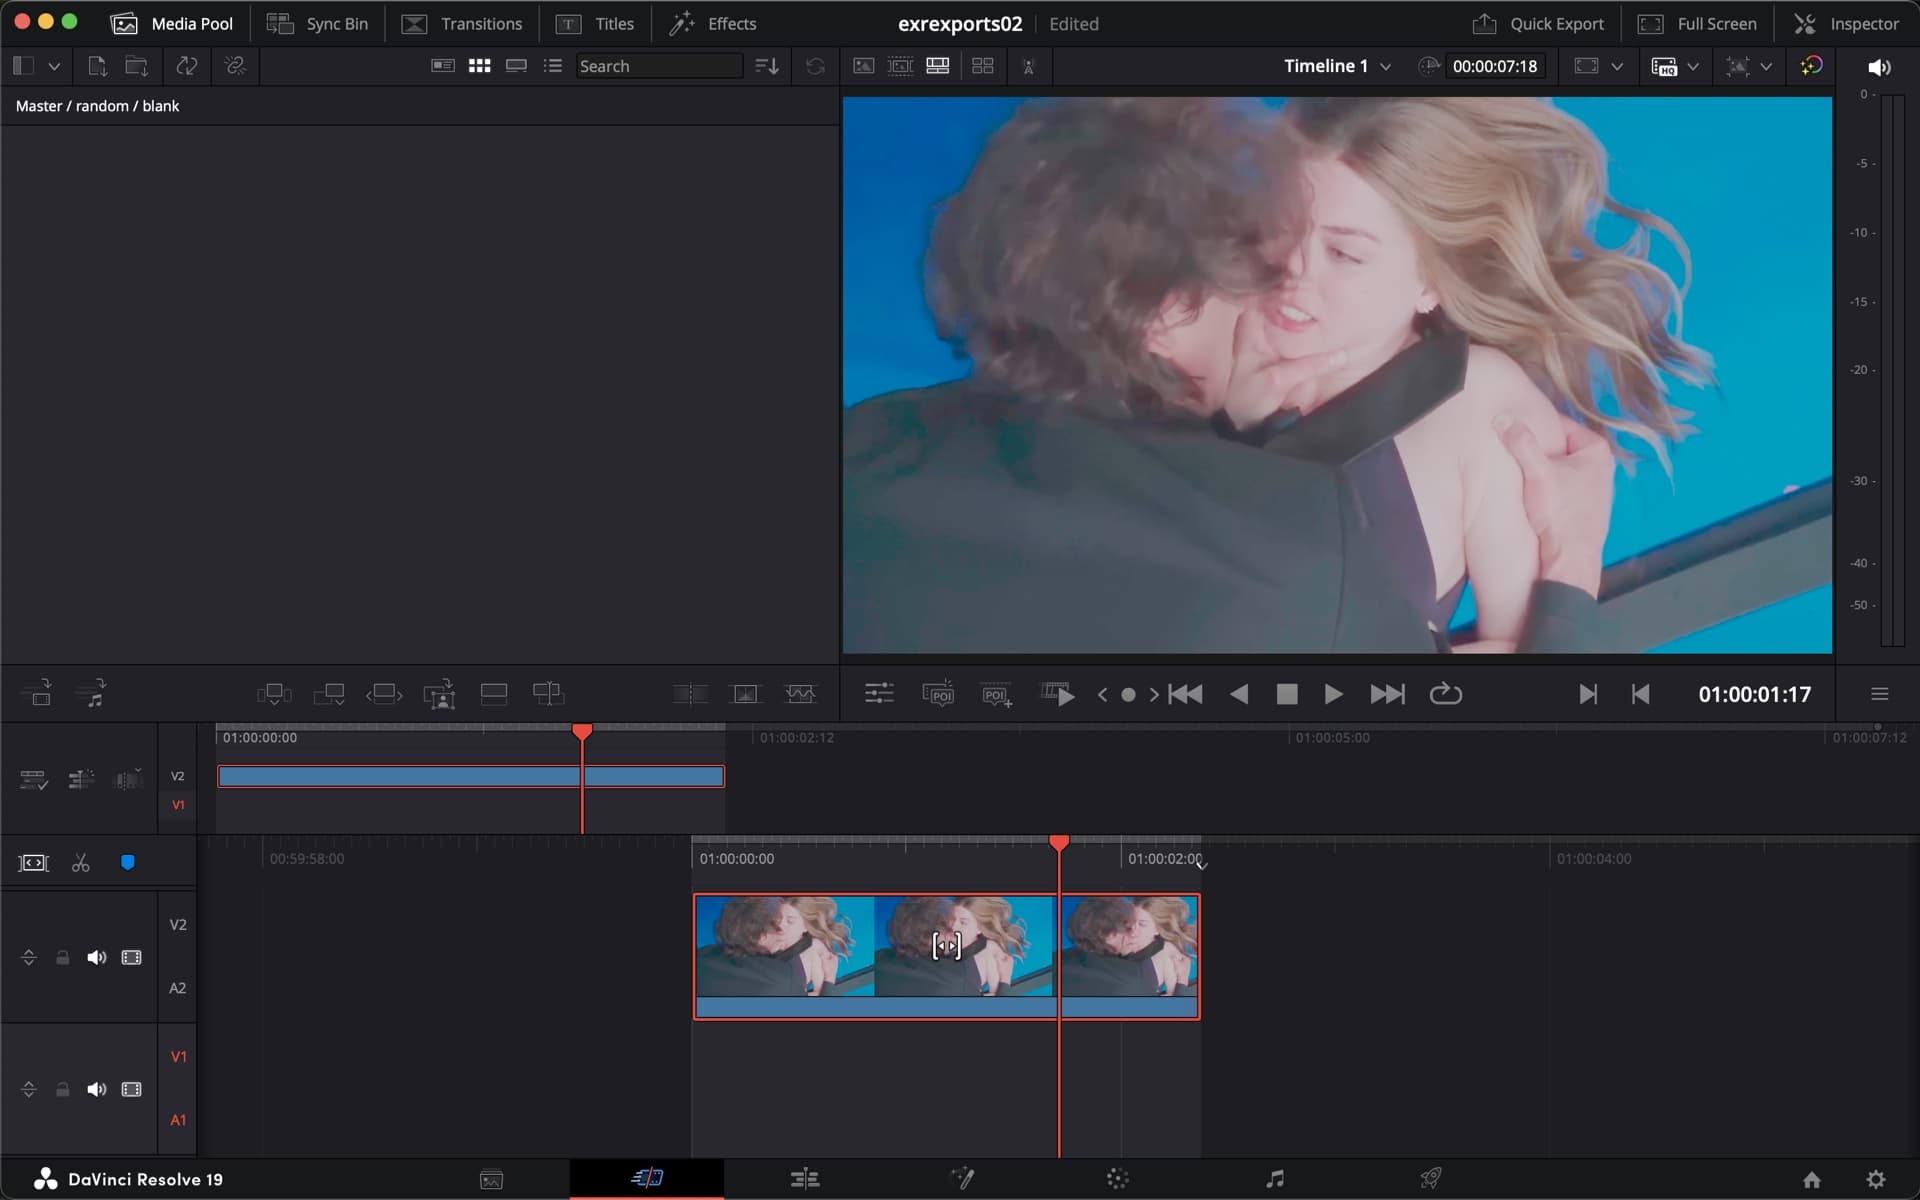
No Input Transform set: milky, low contrast, desaturated. This is the tell. In such cases you will need to manually select your ACES Input Device Transform (IDT). Do this by right-clicking a shot or group of shots in the Media Pool and setting the ACES Input Transform to the appropriate camera log colour space — below, RED › REDcolor2/REDgamma3.
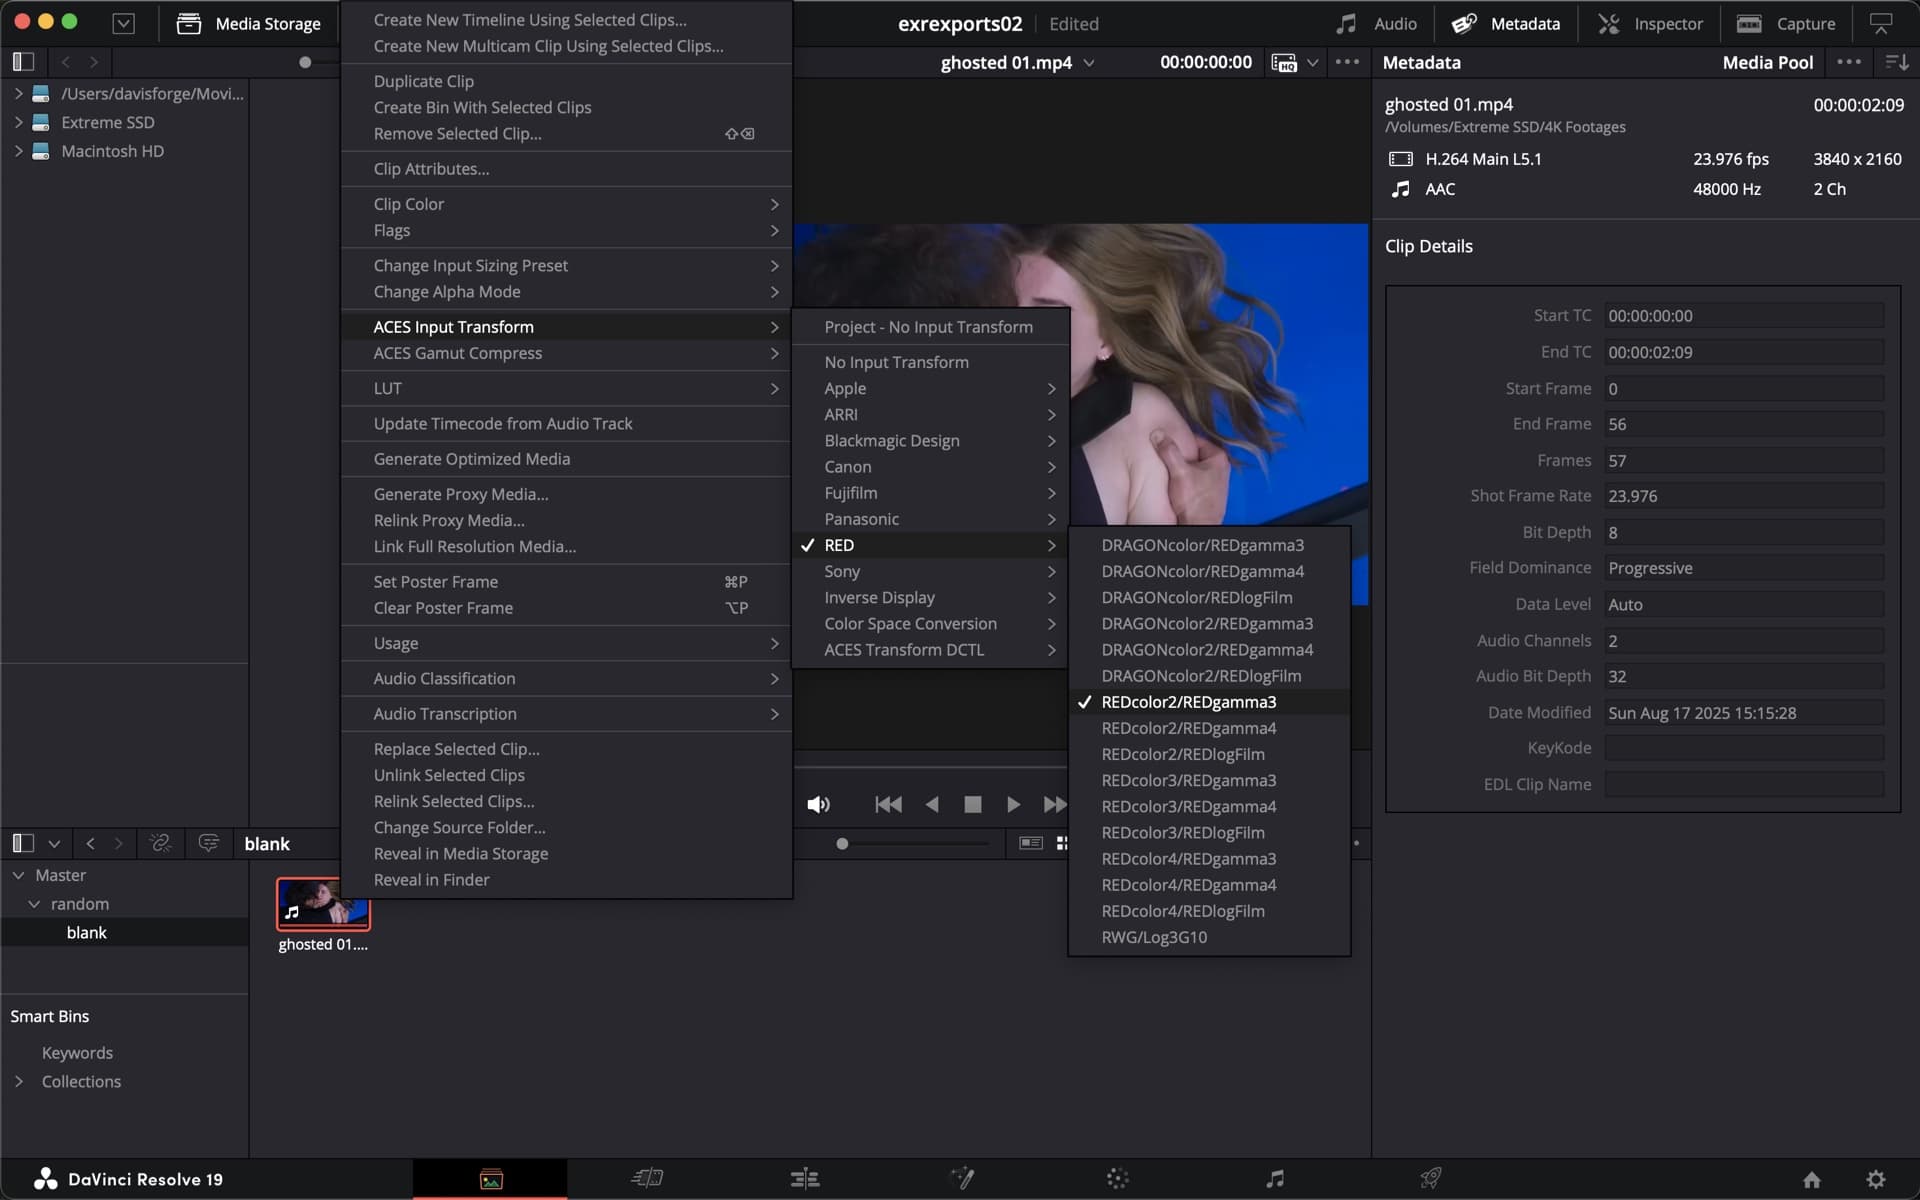
Right-click the clip in the Media Pool › ACES Input Transform › the camera’s colour space. 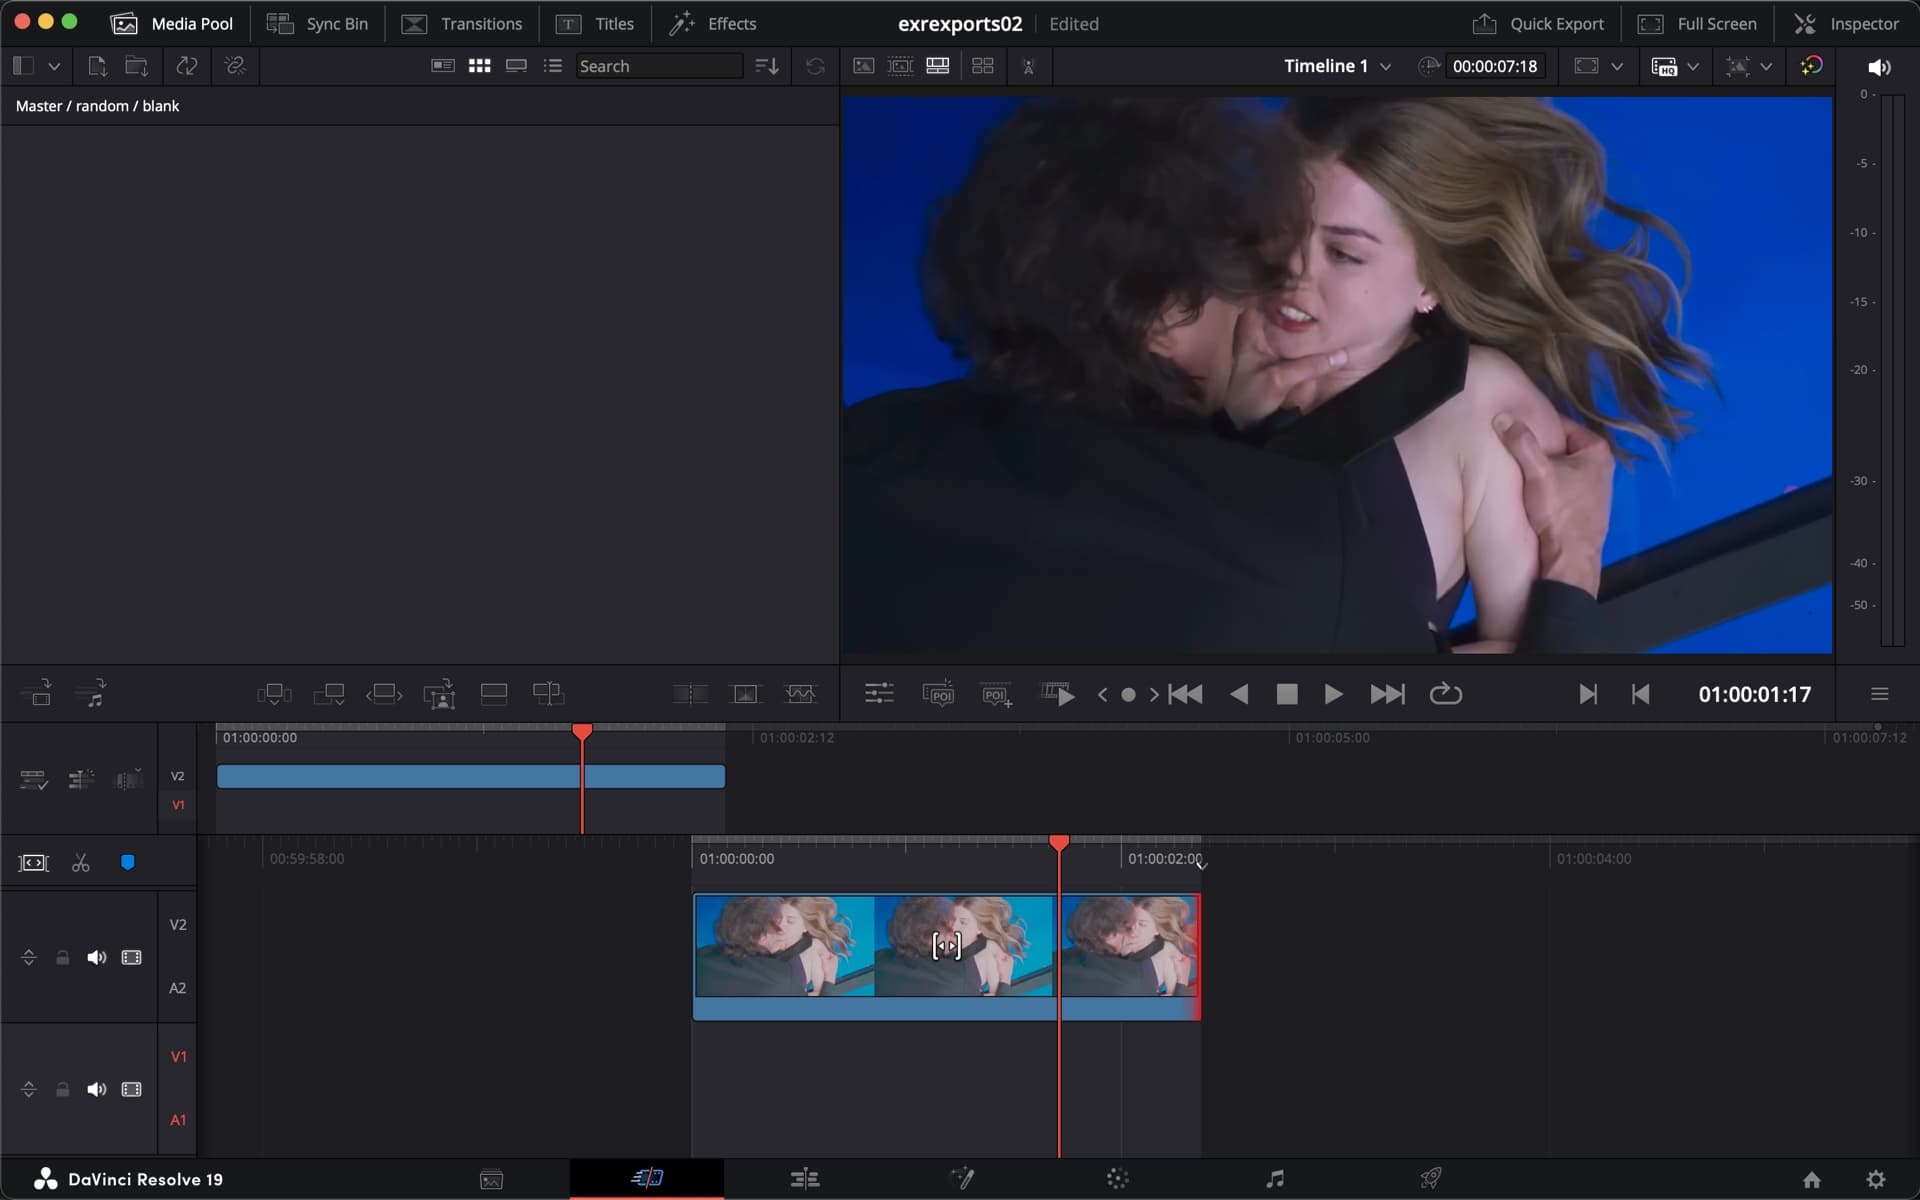
The same frame with the IDT applied — contrast and saturation back where they should be. You may also set your project to default to a specific ACES Input Device Transform. This may be handy if most of your clips will be in a common colour space and cannot be auto-detected.
TIP: Sorting your Media Pool by the “Format” or “Video Codec” columns can help batch-assign IDTs to groups of clips highlighted at one time.
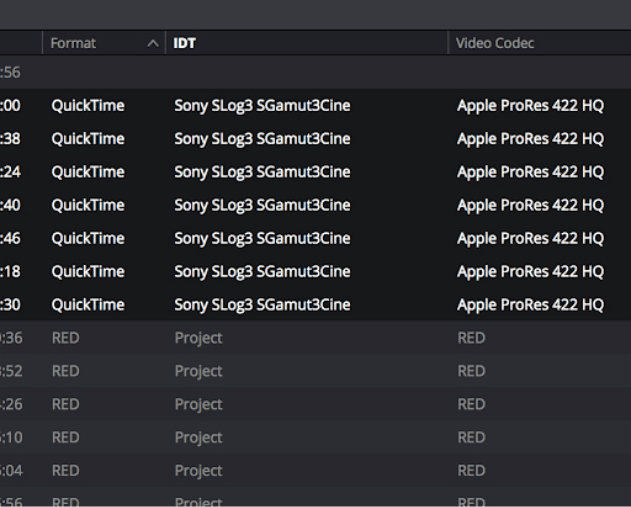
Sorted by Format, the clips needing the same IDT sit together and can be assigned in one go.Image: Netflix Partner Help Center
Rendering
IMF Master, Video Display Master (VDM) or QuickTime references
When rendering images in display colour spaces, make sure your ACES Output Transform is Rec.709 and matches the intended display type. The QuickTime is a reference of how the image should look in your final film, including any grades done on the shot.
An MP4 works well for these files as it keeps the file size down, and the resolution can be set to a maximum of 1080 HD for the reference QuickTime. These reference QuickTimes should be a visual exact match to the proxy media you are sending to offline editorial — the only difference being size, since proxy media for offline edit would be full resolution and typically ProRes.
VFX Pulls (EXR files)
Set the colour space to ACES2065 (AP0). In Resolve this is done by disabling the ACES Output Transform — set it to No Output Transform. This puts the clip in ACES2065-1, used for interchange of images between facilities or software in an ACES pipeline, such as VFX plates. It will make the image appear dark.
Not to worry — this is expected and correct. Scene-linear files are not intended to be viewed in their raw state without the Output Transform. The purpose is to store all the information captured by the camera, independent of any display transform (Rec.709, P3-DCI, etc.), which we have temporarily turned off for exporting the EXR files. This preserves all the wide colour gamut and dynamic range of the original camera RAW file.
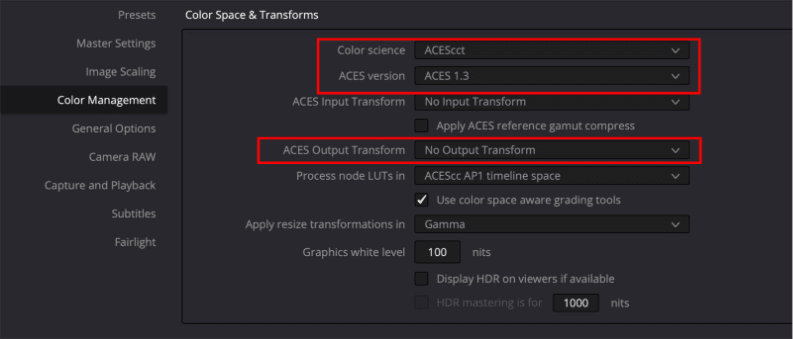
ACES Output Transform set to No Output Transform. Colour science and ACES version stay as they were.Image: Netflix Partner Help Center 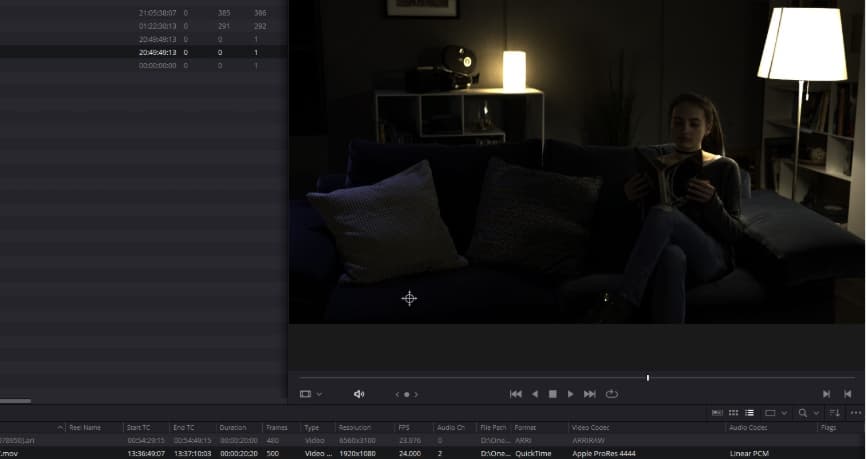
The result on screen. Dark is what correct looks like here — see the note above.Image: Netflix Partner Help Center Disable ACES gamut compression. Frame pulls for VFX should have the ACES Reference Gamut Compression (RGC) DISABLED in Resolve, in the Color Management settings. The RGC will be added by VFX in the returned plates.
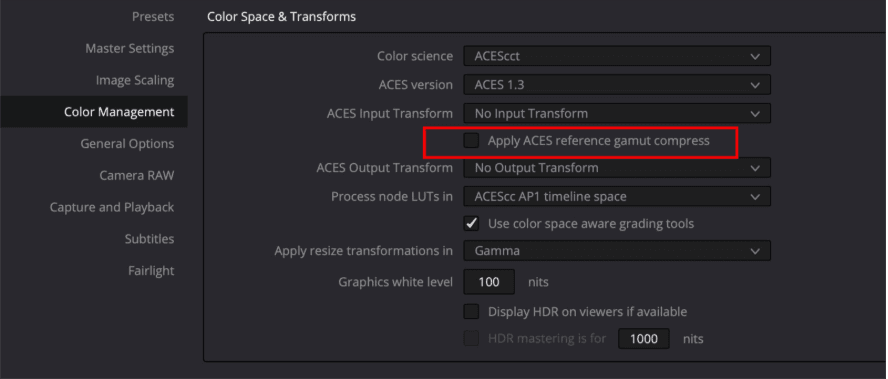
Apply ACES reference gamut compress, unticked.Image: Netflix Partner Help Center Required naming syntax for image sequences is a dot (.) delimiter before and after the numbering.
- Example
- seq_shot_num.0001.exr
- Input
- seq_shot_num.

The Deliver page File Name field. Note the trailing dot — Resolve appends the frame numbering after it.Image: Netflix Partner Help Center Disable all grades for your VFX render by using the Enable Flat Pass option on the Deliver page. The basic idea is that VFX returns the ungraded plate to DI with the VFX added, so that DI gets the full quality film plate as if it were filmed that way. DI can then seamlessly insert it back into the conform and grade everything together.
- Off: DaVinci Resolve always applies each clip’s grade when rendering.
- With clip settings: For each version of a clip, the system will check that version’s pass flat flag. If it’s turned on, the system disables colour correction for that version of the clip; otherwise that version will be rendered with its grade intact. Versions can be individually flagged by right-clicking a clip’s thumbnail in the Timeline, choosing the submenu of the version you want to flag, and choosing Enable Flat Pass.
- Always On: When checked, DaVinci Resolve disables the grade of every clip being rendered.
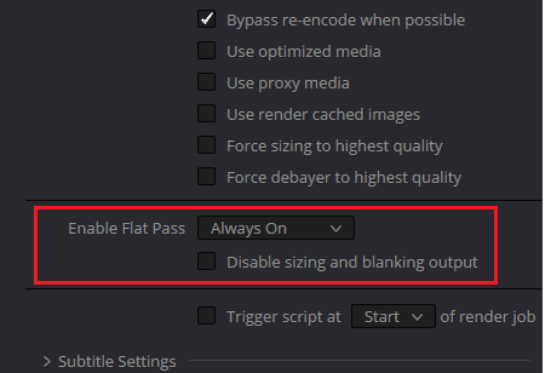
Enable Flat Pass set to Always On.Image: Netflix Partner Help Center Additionally, ensure you meet the following pull requirements:
Framing
- Handles
- No more than 12 frame handles on each shot (24 frames total)
Project Settings
- ACES Output Device Transform
- No Output Transform (ACES2065-1)
- Apply ACES Reference Gamut Compress
- Off
Deliver Page
- Render
- Single Clip
- File Type
- EXR
- Codec
- RGB half, PIZ lossless compression (16-bit half float)
- Render Resolution
- Set to appropriate res
- Enable Flat Pass
- Always On
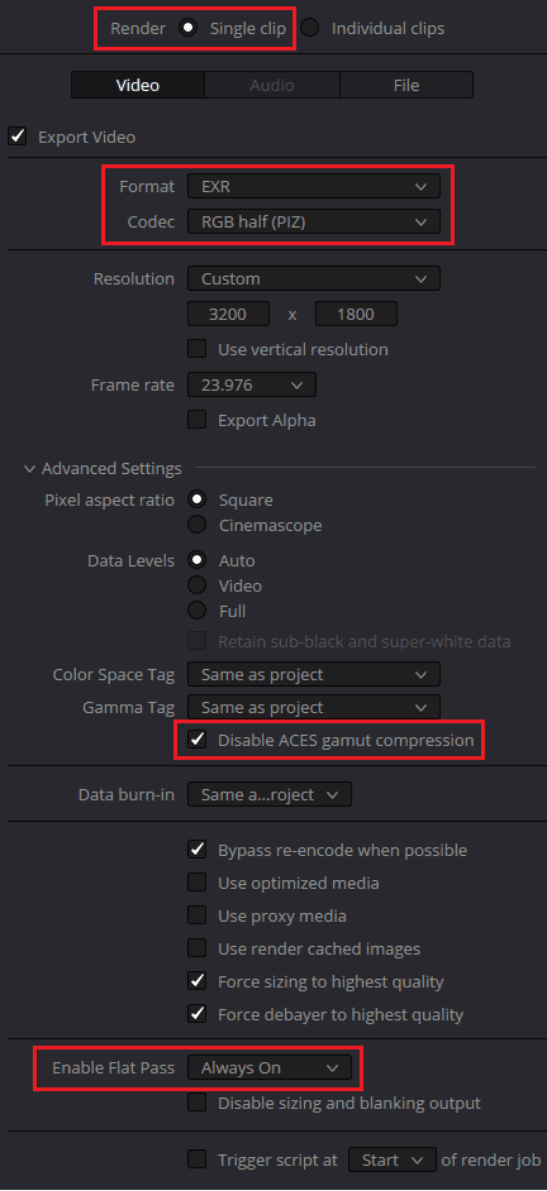
The whole Deliver page, with every required setting boxed.Image: Netflix Partner Help Center TIP: The setting “Force debayer to highest quality” will automatically select what Resolve considers to be the highest debayering quality for each RAW file on the timeline. This may differ from your own findings — feel free to select your preferred debayering algorithm instead and untick this option if you prefer.
Shot Look LUT
If you have a show look, this should be exported as a LUT so VFX can apply it to the VFX shots’ proxy media for editorial, so everything matches in the edit.
In Resolve, the Generate LUT command can be used to export all enabled colour grades — both in the timeline and the clip, including any CDLs — into a single Shot LUT for VFX to use.
The LUT’s working colour space, i.e. the colour space it was created in, should be noted in the file name (for example, shot01_ACEScct.cube for Resolve). VFX needs to know this to properly process the LUT in comp. It is determined by the Color science field in the Color Management section of the Project Settings which, as above, would typically be set to ACEScct.
Naming Conventions
Forged StudiosUnless your show is locked to its own naming convention, this is how we like to receive files.
If you do have one, keep it and tell us what it is — a consistent name we have to learn is far easier to work with than a half-converted one.
- Pattern
Show_Scene_Sequence##_Shot##_pl01_####- Frame name
TheTavern_Greyhold_Sq02_Sh04_pl01.0001.exr- Resolve input
TheTavern_Greyhold_Sq02_Sh04_pl01.
The frame number keeps the dot delimiter required in section 03.
Everything up to and including the trailing dot. Resolve appends the numbering.
The parts
- Show
- The show or film
- Scene
- The scene
- Sequence##
- Sequence number within the scene
- Shot##
- Shot number within the sequence
- pl01
- Plate number — increments for additional plates on the same shot
- ####
- Frame number, dot-delimited (see section 03)
Scene and sequence can be combined
If a scene does not have many sequences in it, combine the scene and sequence into a single token and drop the separate sequence number. Only add sequence numbers when there are several sequences in that scene and you need them to tell shots apart.
- Several sequences
TheTavern_Greyhold_Sq02_Sh04_pl01.0001.exr- Few sequences
TheTavern_Greyhold_Sh04_pl01.0001.exr
Whichever form you pick, stay with it for the whole delivery. Mixed conventions inside one package cost more time to untangle than either convention costs to follow.
Checklist
Setting up the project · Project Settings › Color Management
- Color Science
- ACEScct
- ACES version
- Latest version
- ACES Output Transform
- Rec.709
Bringing in clips · Media Pool
- ACES Input Transform
- Camera’s log colour space
Rendering proxy media · Project Settings & Deliver page
- ACES Output Transform
- Rec.709
- Display
- Should match the intended display type, with grades enabled
- Render
- Single Clip
- File Name
- shot_name
- Format
- MP4
- Codec
- H.264
- Render Resolution
- 1080 HD
Rendering EXRs · Project Settings & Deliver page
- ACES Output Transform
- No Output Transform
- Apply ACES reference gamut compress
- Disabled
- Render
- Single Clip
- File Name
- shot_name.
- Format
- EXR
- Codec
- RGB half (PIZ)
- Render Resolution
- Set to appropriate res
- Enable Flat Pass
- Always On
Source: Netflix Partner Help Center — Reproduced for productions delivering to Forged Studios. Sections marked “Forged Studios” are our own house rules and are not part of the Netflix guidance.